Description
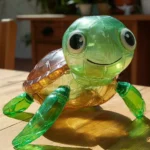
A fun and creative DIY project to make a turtle using a plastic bottle.
Ingredients
Scale
- 1 clear plastic bottle (with a rounded bottom) – Make sure it’s clean and dry!
- Green construction paper or foam sheet – For body parts (head, legs, tail). Other colors can be used.
- Googly eyes
- Acrylic paint – Green, brown, or other colors for the shell.
- Glue – Craft glue or hot glue gun.
- Black marker (optional) – For drawing details.
Instructions
- Carefully cut off the bottom 2–3 inches of the clean plastic bottle. This rounded section will be the turtle’s shell. (Adult supervision recommended for this step).
- Paint the inside of the bottle bottom with acrylic paints for a smooth shell finish. Let it dry completely.
- While the shell dries, cut out four leg shapes, one head shape, and one tail shape from green construction paper or foam.
- Assemble the turtle’s body by gluing the head, legs, and tail together, or onto a flat piece of paper/foam.
- Once the shell is dry, turn it upside down and glue it securely onto the assembled turtle body.
- Glue googly eyes onto the head. Use a black marker to add a mouth, shell patterns, or other details.
Notes
- For younger children, adult supervision is recommended during cutting and gluing.
- Different colors can be used for a unique turtle design.
- Make sure the bottle is thoroughly clean and dry before starting.
- Prep Time: 15 minutes
- Category: Craft
- Method: DIY
- Cuisine: N/A
Nutrition
- Serving Size: N/A
- Calories: N/A
- Sugar: N/A
- Sodium: N/A
- Fat: N/A
- Saturated Fat: N/A
- Unsaturated Fat: N/A
- Trans Fat: N/A
- Carbohydrates: N/A
- Fiber: N/A
- Protein: N/A
- Cholesterol: N/A