Description
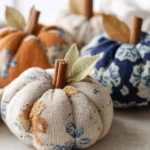
Create adorable fall decor easily with these cute sock pumpkins made from leftover socks.
Ingredients
Scale
- 1 sock
- ¾ cup rice
- small handful pillow stuffing (polyfil)
- small hair elastic
- needle
- embroidery thread 32“
- felt leaf template
- scrap of felt for leaf
- scrap of felt for stem (3.5″ x .5″)
Instructions
- Cut a crew sock in half, right through the center of the heel.
- If using the foot of the sock, fill it with ¾ cup of rice and a small handful of pillow stuffing.
- Tie off with a hair elastic (can also use dental floss or yarn).
- Trim excess sock with scissors.
- Cut a strand of embroidery thread that is 32″ long. Thread it through a needle and tie a knot at the end.
- Press the sock ball down to squish it down a bit.
- Poke the needle through the center of the sock and out the back, pulling until the knot hits.
- Bring the needle around to the top again, insert through the center and out the back again, then pull the thread tight to create a pumpkin groove.
- Continue this process until you have 6 sections (dimples).
- Pull the thread tight as you tie a couple of knots on the bottom of the pumpkin and trim excess thread.
- Hot glue the leaf to the top of the pumpkin.
- Roll the strip of felt up tightly and secure the end with hot glue.
- Glue the felt stem to the top of the pumpkin.
- If using the top of the sock, turn it inside out and tie the raw end with a hair elastic, then turn it right side out and follow similar instructions for filling and shaping.
Notes
- Refer to a step-by-step video for a visual guide on creating the pumpkin sections.
- You can use dental floss or yarn instead of a hair elastic for tying off.
- Prep Time: 15 minutes
- Cook Time: No cooking required
- Category: Craft
- Method: Sewing and gluing
- Cuisine: Fall decor
Nutrition
- Serving Size: N/A
- Calories: N/A
- Sugar: N/A
- Sodium: N/A
- Fat: N/A
- Saturated Fat: N/A
- Unsaturated Fat: N/A
- Trans Fat: N/A
- Carbohydrates: N/A
- Fiber: N/A
- Protein: N/A
- Cholesterol: N/A